Blender HDRI Setup and USD Export
Tested with Blender 5.0.1.
Download the example Blender scene.
Overview
The example .blend file includes a pre-configured HDRI lighting setup designed to export correctly through the Miris pipeline. There are two values you need to set — your desired lighting level for the Blender viewport, and a corresponding export value that ensures the lighting is correctly encoded in the USD file.
This guide walks you through setting those values, previewing the result, and exporting.
Before You Start
If you need to rotate the HDRI environment map, do it before setting any lighting values. Changing the rotation after calibration affects how light falls on the scene and will require you to redo the lighting setup.
To rotate the HDRI, adjust the Rotation values in the Mapping node in the World shader (Shading workspace → World context).
Step 1: Open the File and Import Your Asset
- Open the example
.blendfile in Blender 5.0.1 or later. - Import your asset via File → Import and select the appropriate format.
Step 2: Set the Lighting Intensity
The example file's World shader has two lighting nodes you'll need to set:
- Blender Light Intensity — controls how the scene looks in Blender's viewport and Cycles renders
- Export Light Intensity — encodes the correct brightness into the exported USD file
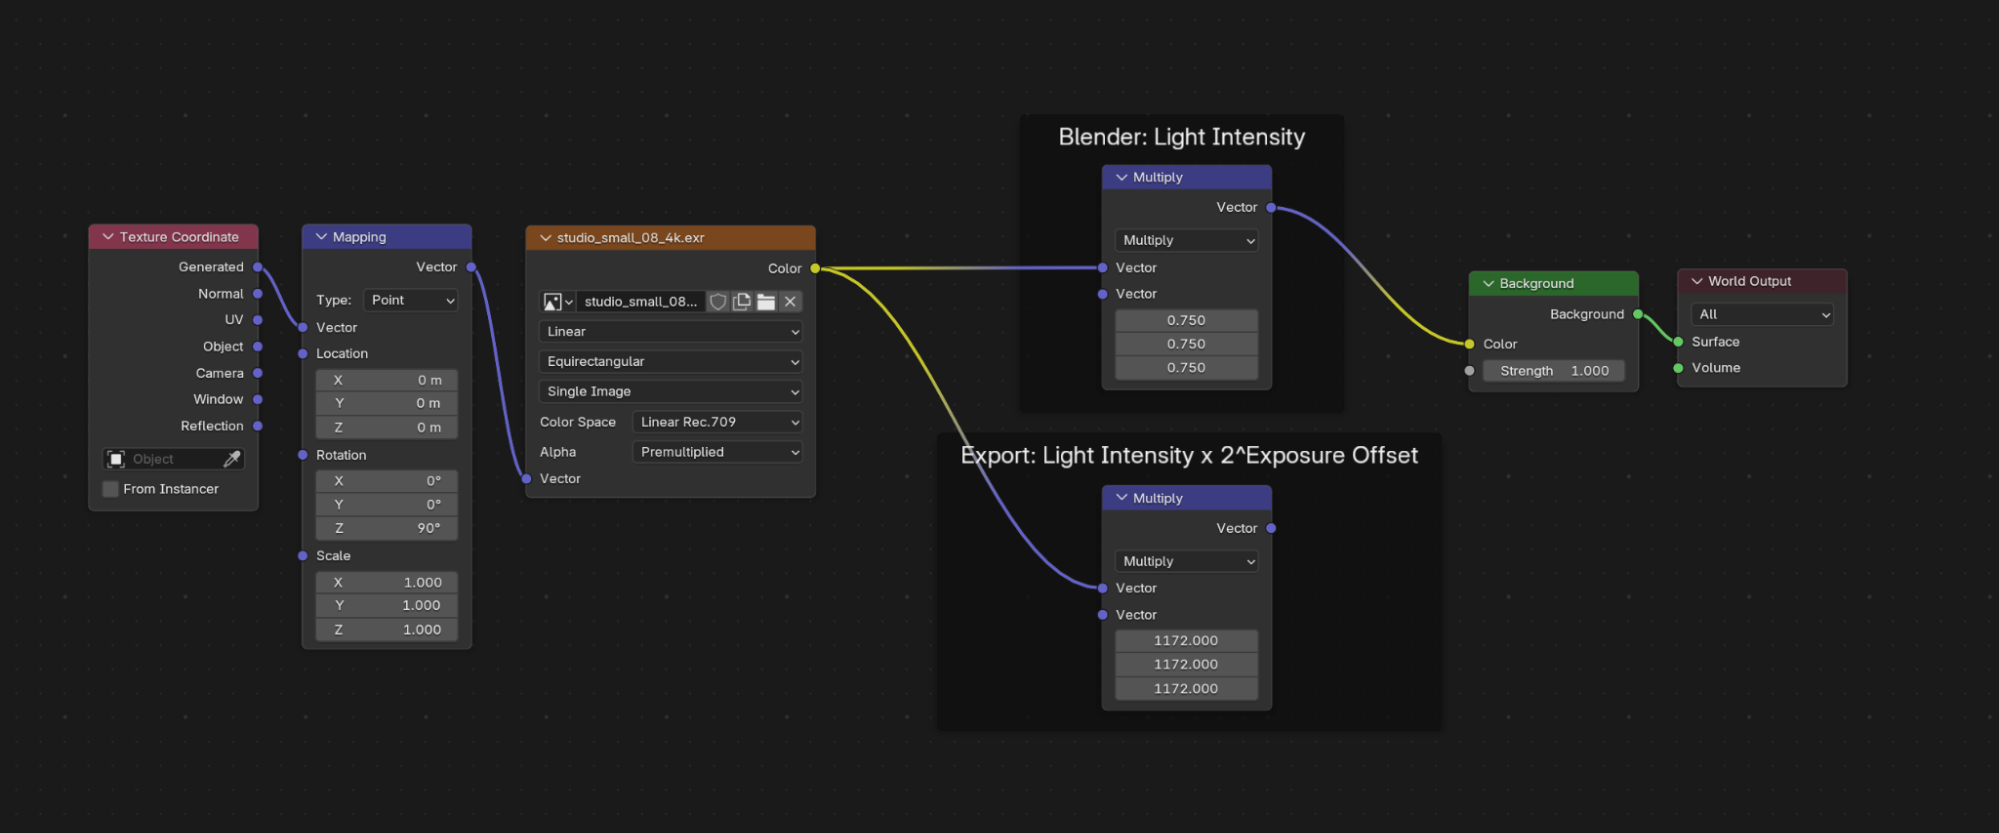
Set the Blender Light Intensity
The Strength field on the Background node has no effect on the USD export — brightness is controlled entirely through the Multiply nodes.
- Open the Shading workspace and switch to the World context.
- Find the Blender Light Intensity Multiply node.
- Set the second input vector to your desired level — for example,
(1, 1, 1)for standard intensity.
All three values should always be the same number. The Multiply node works in 3D color space, so you're setting red, green, and blue equally.
Calculate and Set the Export Light Intensity
The export value accounts for the difference between Blender's internal light units and what the Miris pipeline expects. Multiply your Blender intensity by 1562 to get it:
Export Light Intensity = Blender Light Intensity × 1562
| Blender Light Intensity | Export Light Intensity |
|---|---|
| 0.5 | 781 |
| 1 | 1562 |
| 2 | 3124 |
- Find the Export Light Intensity Multiply node.
- Set its second input vector to your calculated value — for example,
(1562, 1562, 1562)for a Blender intensity of 1.
Step 3: Preview the Result
Blender's viewport shows the scene at the Blender light intensity level by default, which will look much brighter than what Miris will render. To preview the final output:
- Open Render Properties (camera icon in the Properties panel).
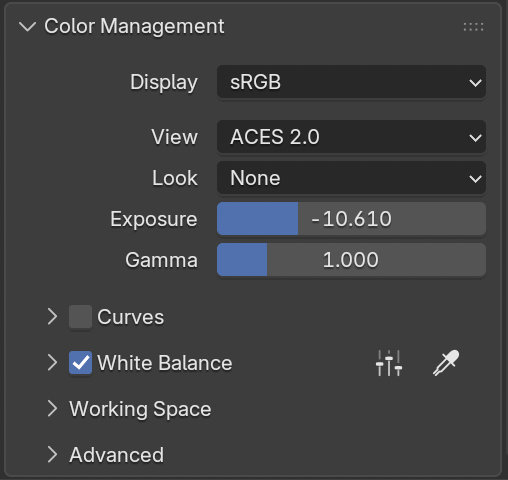
- Navigate to Color Management.
- Set the following:
- Display: sRGB
- View: ACES 2.0
- Exposure: -10.61
Reset Exposure to 0.0 when you're done previewing — leaving it at -10.61 will make the scene appear incorrectly dark for all other work in Blender.
Next, set the white balance:
- Enable White Balance.
- Click White Balance Presets.
- Select Illuminant D65 — this sets Temperature to 6502K and Tint to 9.8.
Step 4: Export and Upload
- Go to File → Export → Universal Scene Description (.usd*).
- Confirm the following settings are enabled:
- Convert World Material — must be on; this converts the World shader to a DomeLight in the USD file
- Export Textures — copies the HDRI into a
textures/folder alongside the USD
- Export the file.
- Upload the complete exported folder to Miris, including the
textures/subfolder with the HDRI file.
Exported USD DomeLight Structure
The exported USDA will contain a DomeLight prim with the following structure:
def DomeLight "env_light"
{
    color3f inputs:color = (1562, 1562, 1562)
    asset inputs:texture:file = @./textures/your_hdri.exr@
    float3 xformOp:rotateXYZ = (90, 0, -90)
    uniform token[] xformOpOrder = ["xformOp:rotateXYZ"]
}
| USD Attribute | Source | Description |
|---|---|---|
inputs:color | Export Multiply node | The calibrated export intensity, encoded as an RGB color multiplier |
inputs:texture:file | Environment Texture node | Path to the HDRI file |
xformOp:rotateXYZ | Mapping node + coordinate conversion | Orientation of the environment map |
inputs:intensity | Not written (defaults to 1.0) | Blender's USD exporter does not export this attribute for image-based dome lights |
Troubleshooting
Output looks too dark
Multiply your Blender Light Intensity value by 2, then recalculate and update the Export Light Intensity.
Output looks too bright
Divide your Blender Light Intensity value by 2, then recalculate and update the Export Light Intensity.
Red color shift on surfaces
Disable MaterialX Network in the USD export dialog and re-export. This can occur when MaterialX is enabled and falls back to UsdPreviewSurface, which handles surface materials correctly.